Norfolk Island Pine
Araucaria heterophylla
Star Pine, Triangle Tree, Living Christmas Tree
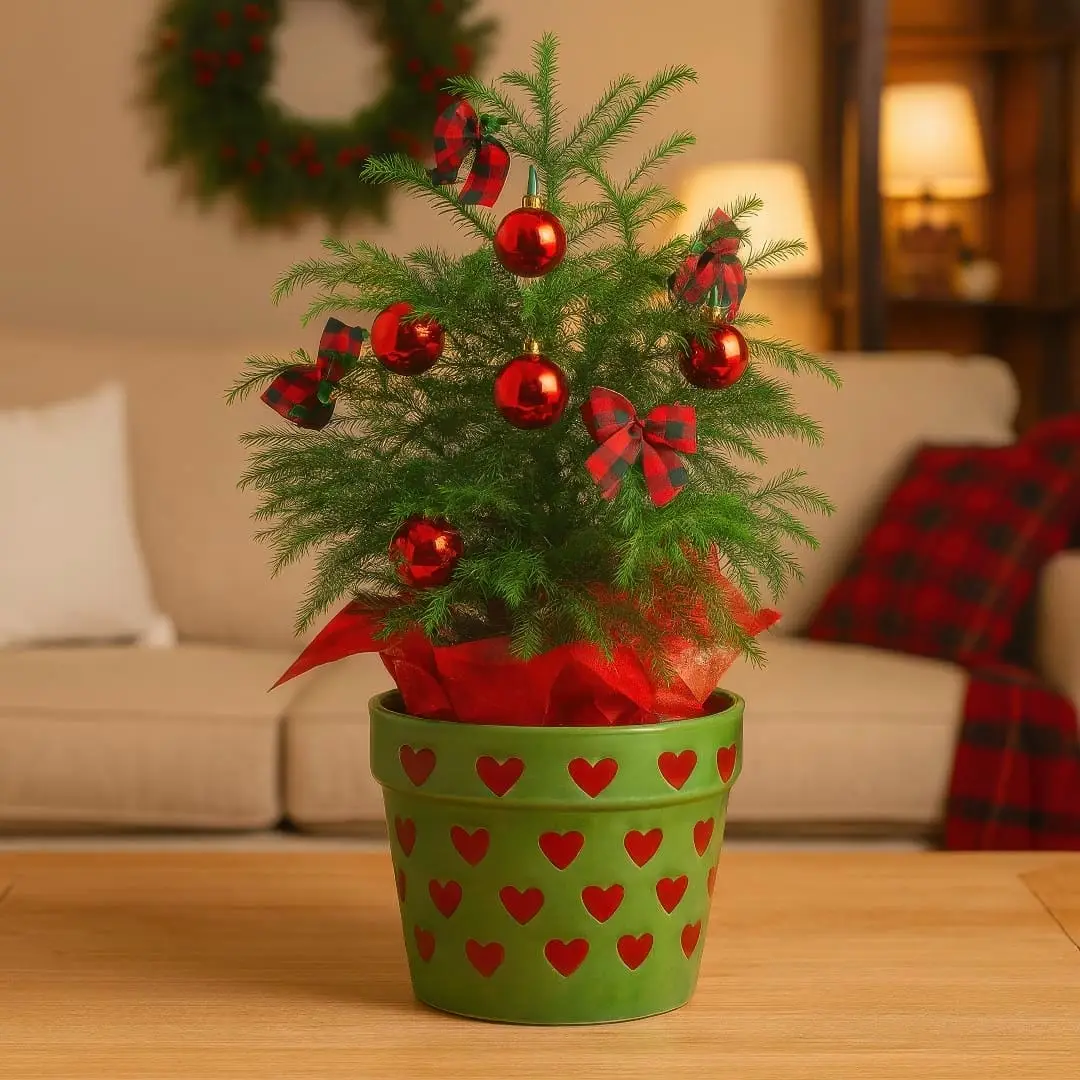
The Norfolk Island Pine (Araucaria heterophylla) is a graceful and elegant houseplant, admired for its soft, layered branches and classic pyramidal shape. This beautiful evergreen brings a touch of the forest indoors, making it a popular choice as a year-round houseplant and a reusable living Christmas tree.
📝 Norfolk Island Pine Care Notes
🌿 Care Instructions
⚠️ Common Pests
📊 Growth Information
🪴 In This Guide 🪴
📺 Norfolk Island Pine Video Guide

☀️ Norfolk Island Pine Light Requirements (Indoor Lighting Guide)
Best Light for a Healthy Norfolk Island Pine
Finding the perfect lighting is key to keeping your Norfolk Island Pine healthy and its growth even.
Ideal Lighting: These trees do best in a spot with lots of bright, indirect light. An east-facing window is perfect, or a spot a few feet back from a south or west-facing window. They can even do well with fluorescent lights, making them a good option for an office.
Rotate for Even Growth: To keep that classic, symmetrical Christmas tree shape, it's a good idea to rotate your plant every few weeks. This will prevent it from leaning towards the light.
Can It Tolerate Direct Sun or Low Light?
Direct Sun: A little bit of direct morning sun is usually fine, but be careful of harsh, direct afternoon sun. Too much direct sunlight can scorch the needles, causing them to turn brown.
Low Light: While a Norfolk Island Pine can tolerate lower light conditions, it won't be at its best. In low light, growth will slow, and the plant may become stretched and "leggy" as it reaches for more light.

💧 Norfolk Island Pine Watering Guide (How to Water)
Watering Frequency and Technique
Proper watering is one of the most important aspects of Norfolk Island Pine care. They like their soil to be consistently moist, but not waterlogged.
When to Water: The best rule of thumb is to water when the top 1-2 inches of soil feel dry to the touch. This usually means watering about once a week during the spring and summer. In the fall and winter, when the plant's growth slows, you'll need to water less often.
How to Water: Water the plant thoroughly until you see water coming out of the drainage holes. This ensures that the entire root ball gets a good drink. After watering, be sure to empty any excess water from the saucer. Letting the pot sit in water is a sure way to cause root rot.
Water Quality and Signs of Improper Watering
Water Quality: These plants can be sensitive to the chemicals in tap water. If you notice browning tips on the needles, try using filtered, distilled, or rainwater.
Signs of Overwatering vs. Underwatering: Drooping branches can be a sign of both too much and too little water. Always check the soil to figure out the cause. If it's soggy, you need to water less. If it's very dry, give it a good watering.
🪴 Best Soil for Norfolk Island Pine (Potting Mix & Drainage)
The right soil mix is important for a healthy Norfolk Island Pine. It needs a mix that holds some moisture but also drains well to prevent the roots from getting waterlogged.
A peat-based potting mix is a great choice for this plant. You can use a high-quality, all-purpose potting mix and amend it with some peat moss and perlite or sand to improve drainage and create a slightly acidic environment, which this plant prefers. The most important thing is to use a pot with drainage holes. Without proper drainage, your plant will be very susceptible to root rot.
🍼 Fertilizing Norfolk Island Pine (When and How)
Feeding your Norfolk Island Pine during its growing season will help it stay lush and green.
Fertilizer Type: A balanced, water-soluble fertilizer formulated for houseplants is a good choice. Look for one with a balanced N-P-K ratio, like 20-20-20.
Frequency: Fertilize your tree about once a month during the spring and summer. You don't need to fertilize in the fall and winter when the plant is not actively growing. If you want to keep your tree on the smaller side, you can fertilize less often.
Application: Always dilute the fertilizer to half the strength recommended on the package to avoid burning the roots. Apply it to soil that is already moist, never to dry soil.
🌡️ Norfolk Island Pine Temperature Range (Ideal Indoor Temps)
As a tropical plant, the Norfolk Island Pine prefers warmer temperatures and doesn't like the cold.
Ideal Temperature Range: This plant is happy with normal room temperatures, between 65-75°F (18-24°C). It can tolerate slightly cooler temperatures, but not for long periods.
Avoid Cold Drafts: Keep your Norfolk Island Pine away from drafty windows and doors, as well as heating and cooling vents. Sudden temperature changes can stress the plant. It's also important not to let the temperature drop below 35°F (1°C), as this can damage the plant.
💦 Norfolk Island Pine Humidity Needs (Prevent Crispy Needles)
Ideal Humidity for Norfolk Island Pine
Consistent humidity is crucial for keeping your Norfolk Island Pine looking its best. Dry air is a common problem, especially in the winter when our homes are heated.
Ideal Humidity Range – This plant thrives in moderate to high humidity, ideally 50% or higher. If the air is too dry, you'll likely see the tips of the needles turning brown and crispy.
How to Increase Humidity for Your Norfolk Island Pine
Here are a few easy ways to create a more humid environment for your tree:
- Misting: Mist the needles with room temperature water every few days. This will give it a temporary boost in humidity.
- Pebble Tray: Place the pot on a tray filled with pebbles and water. As the water evaporates, it will increase the humidity around the plant. Just make sure the pot is sitting on the pebbles and not in the water.
- Humidifier: Using a room humidifier is the most effective way to maintain a consistent level of humidity.
- Grouping Plants: Place your Norfolk Island Pine near other plants that love humidity. They will all benefit from the increased moisture in the air.

🏷️ Norfolk Island Pine Types and Varieties (Araucaria heterophylla Cultivars)
Unlike many other popular houseplants, there is only one variety of Norfolk Island Pine: Araucaria heterophylla. While there are other species in the Araucaria genus, such as the Monkey Puzzle Tree (Araucaria araucana), they are not the same as the Norfolk Island Pine and have different care needs. The classic look and feel of the Norfolk Island Pine all belong to this one beautiful species.
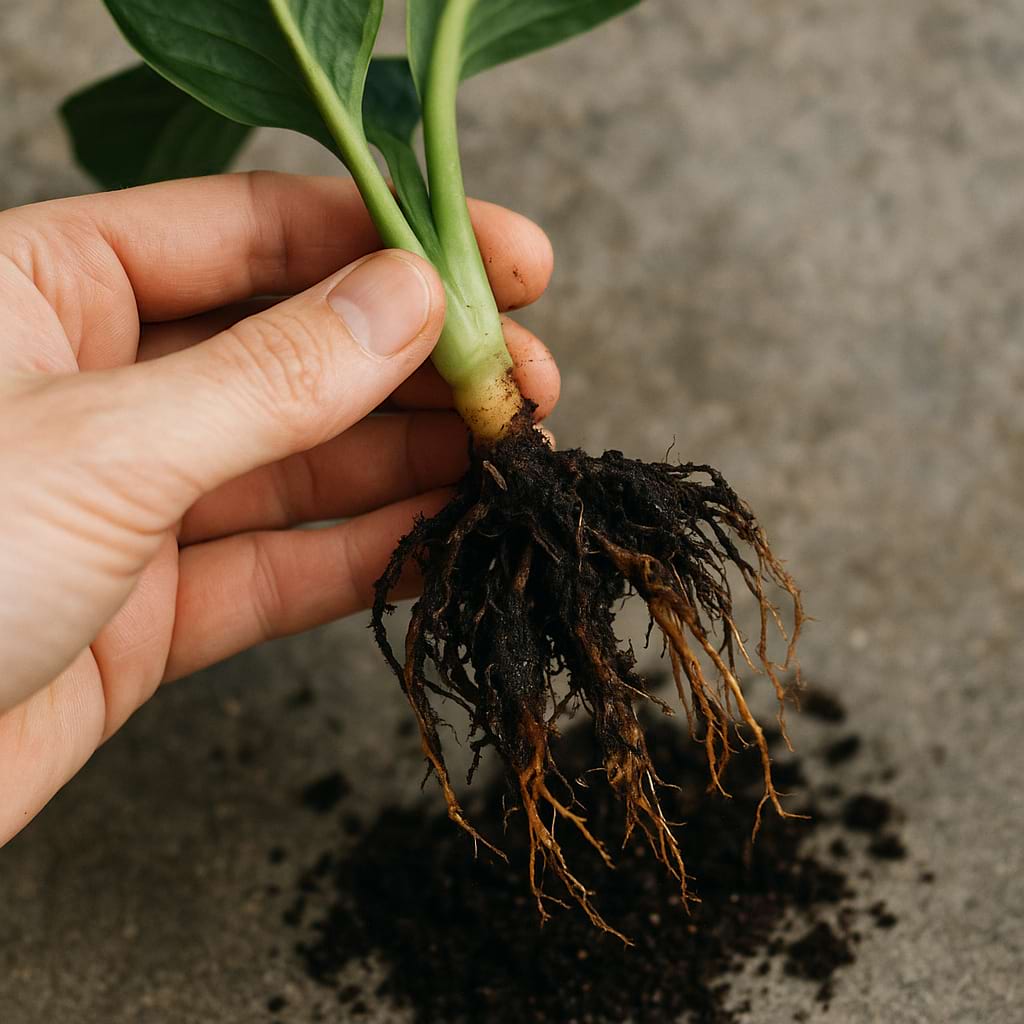
🪴 Potting and Repotting Norfolk Island Pine (When and How)
As a slow-growing plant, your Norfolk Island Pine won't need to be repotted very often. Repotting every 2-3 years is usually enough.
Best Pot and Soil for Norfolk Island Pine
Pot Selection: Use a pot that is 1-2 inches larger in diameter than the current one. A pot that is too big will hold too much moisture and can lead to root rot. Always make sure the pot has drainage holes.
Potting Mix: A peat-based, well-draining potting mix is ideal.
When to Repot Norfolk Island Pine
The best time to repot is in the spring. You'll know it's time to repot when you see roots growing out of the drainage holes, or when the plant's growth seems to have stalled.
How to Repot Norfolk Island Pine (Step-by-Step)
- Water the plant a day or two before you plan to repot.
- Gently remove the plant from its current pot.
- Inspect the roots and trim away any that are brown or mushy.
- Place a layer of fresh potting mix in the new pot.
- Set the plant in the new pot at the same depth it was in the old one.
- Fill in the sides with more potting mix and gently pat it down.
- Water the plant well and let it drain.
✂️ Pruning Norfolk Island Pine (How to Trim)
Why Less is More: Preserving the Shape
Norfolk Island Pines require very little pruning. In fact, it's best to avoid trimming them if you can, as it can spoil their natural symmetrical shape. Never cut off the central leader (the main, topmost growing point), as this will permanently alter the tree's shape and stop its vertical growth.
What to Prune: Removing Dead Branches
The only pruning that is recommended is to remove any dead or brown lower branches as they naturally die off. Use a clean, sharp pair of pruning shears or scissors to make a clean cut close to the main stem. This helps keep the plant looking tidy and healthy.
🌱 How to Propagate Norfolk Island Pine
Propagating a Norfolk Island Pine is not as straightforward as it is for many other houseplants. It's quite challenging to do successfully at home.
The most reliable way to propagate a Norfolk Island Pine is from seed. However, getting your hands on fresh, viable seeds can be difficult, as the tree rarely produces cones when grown indoors.
While it is possible to propagate from cuttings, it's not a simple process and often doesn't produce a well-shaped tree. Cuttings taken from side branches will not grow into the symmetrical, upright tree you're used to. For a new plant that will have the classic Norfolk Island Pine shape, you would need to take a cutting from the main, vertical stem, which would ruin the look of the mother plant.
Because of these challenges, it's usually easier to buy a new plant if you want another one.
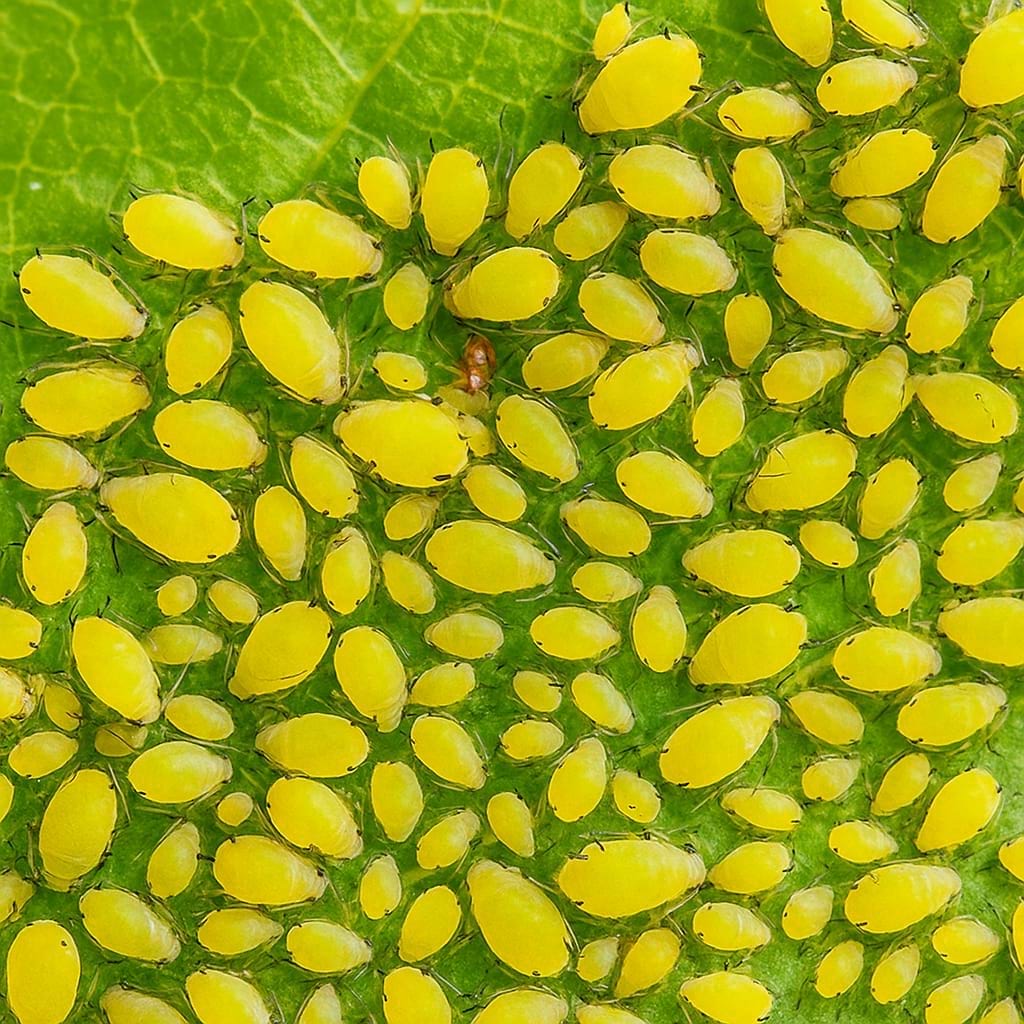
🐛 Norfolk Island Pine Pests and Treatment
Common Pests of Norfolk Island Pine
While generally pest-free, a stressed Norfolk Island Pine can be susceptible to a few common houseplant pests. Keep an eye out for:
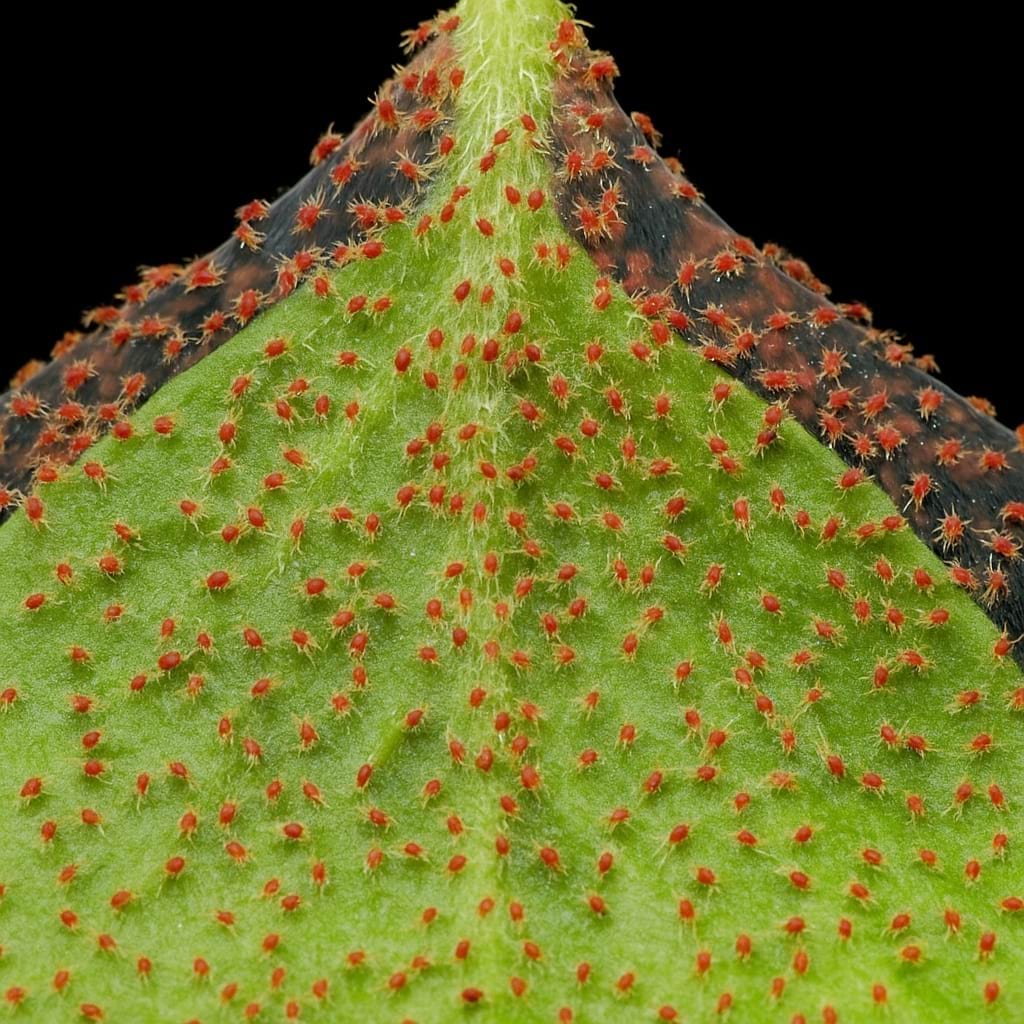
- Spider Mites: These tiny pests thrive in dry conditions. Look for fine webbing on the plant and small yellow or brown spots on the needles.
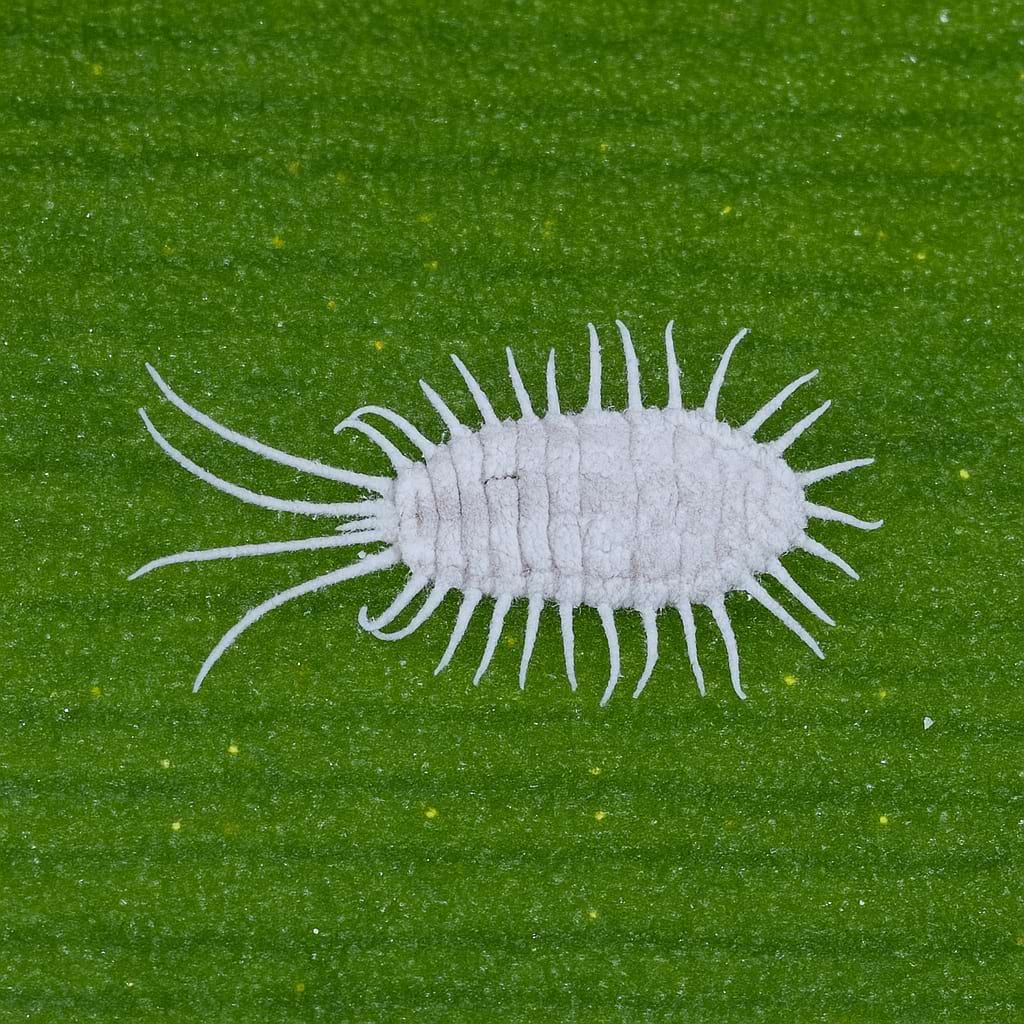
- Mealybugs: These look like small, white, cottony masses, usually found in the crevices where branches meet the stem.
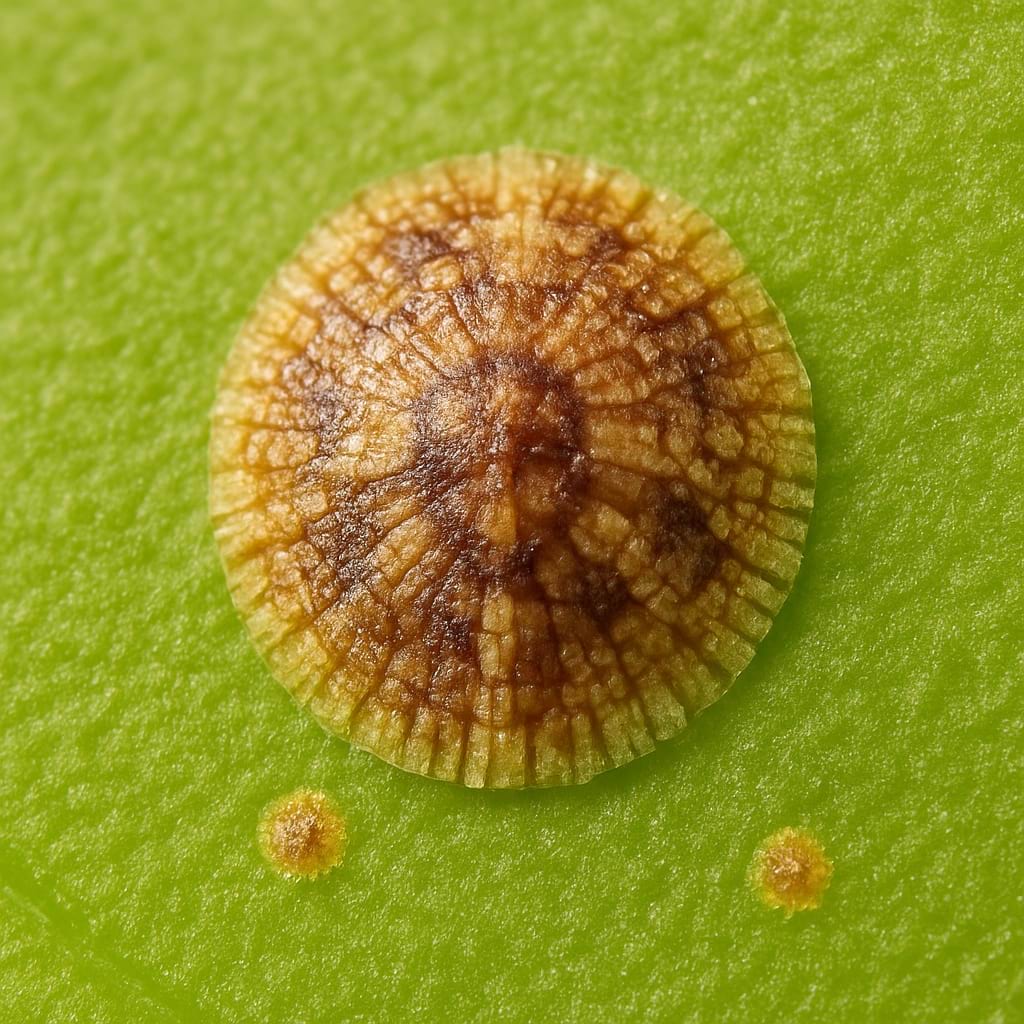
- Scale Insects: These appear as small, brown, raised bumps on the stems and needles.
- Aphids: These are small, pear-shaped insects that can cluster on new growth.
How to Treat Pests
If you see any pests, isolate your plant immediately to prevent them from spreading to your other plants. You can often get rid of them by washing the plant with a strong spray of water. For more stubborn infestations, use an insecticidal soap or neem oil, making sure to cover all parts of the plant.
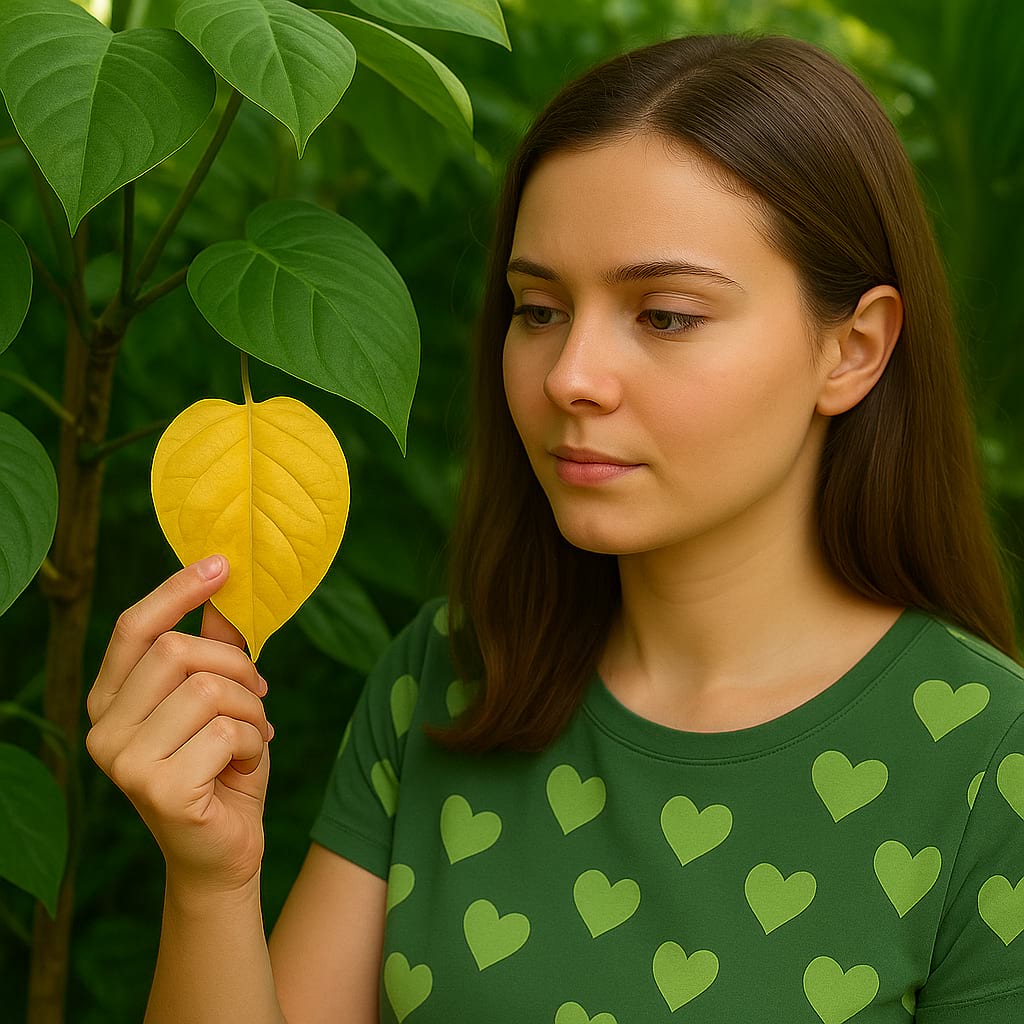
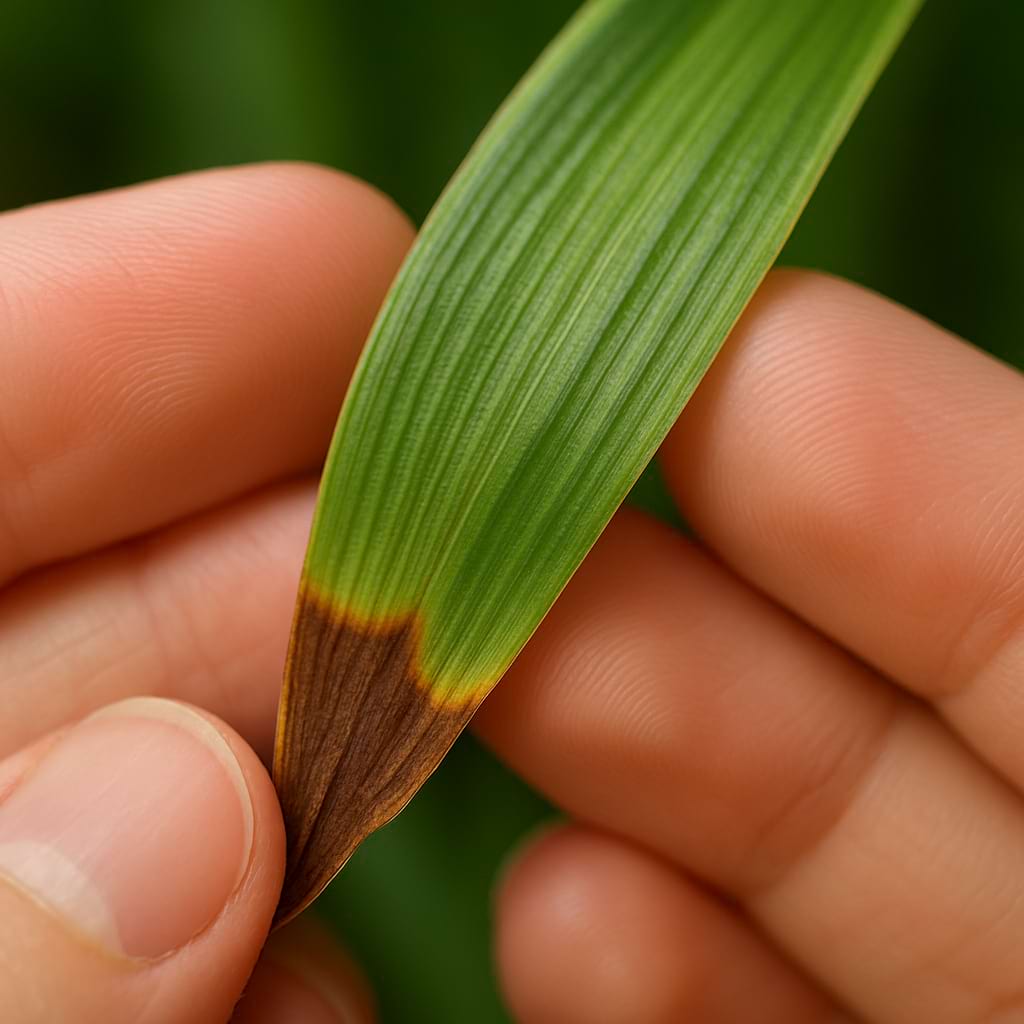
🩺 Norfolk Island Pine Problems and Diseases (Troubleshooting)
Your Norfolk Island Pine will usually let you know when it's unhappy. Here are some common problems and how to fix them:
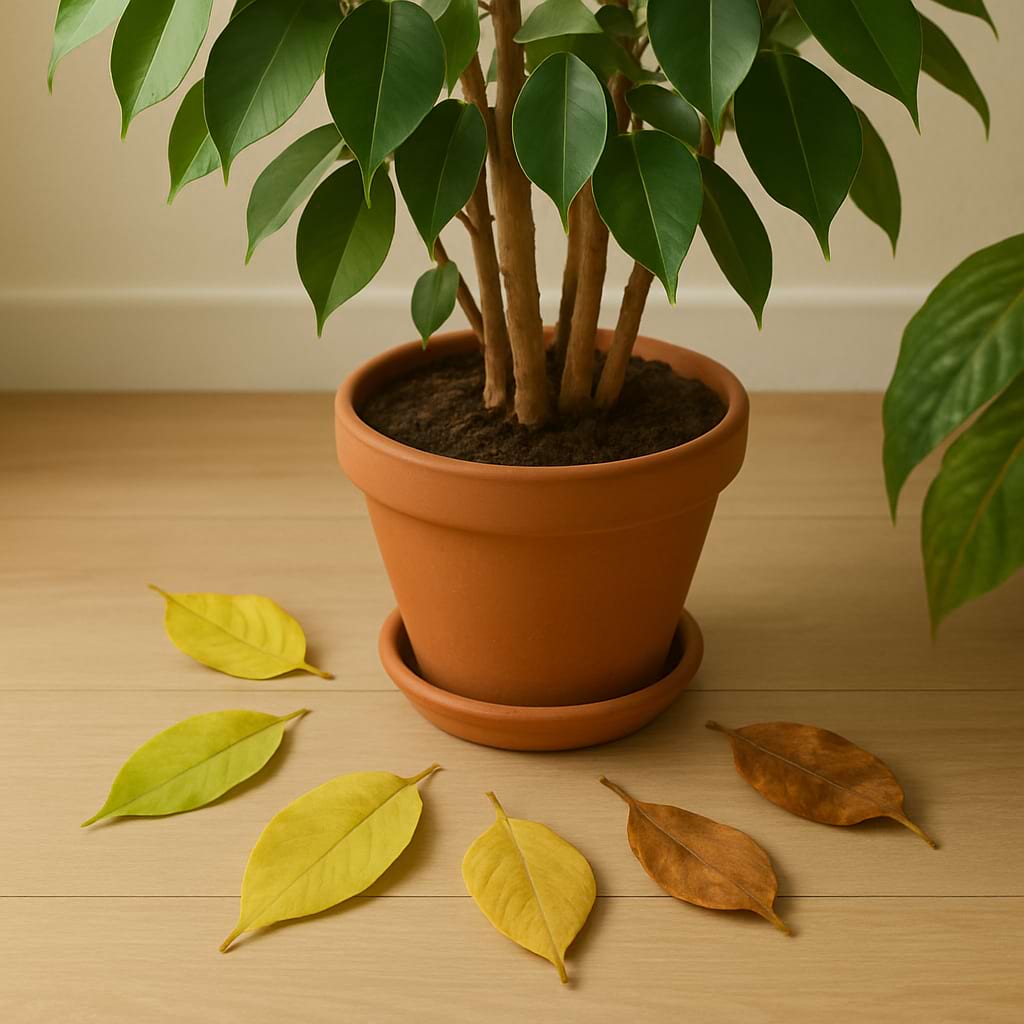
- Brown, Crispy Needles: This is most often caused by low humidity or underwatering. Increase the humidity around your plant and make sure you're watering it regularly.
- Yellowing Needles: This can be a sign of overwatering or a nutrient deficiency. Check the soil moisture and make sure the pot is draining well. If the soil isn't too wet, you may need to fertilize your plant.
- Drooping Branches: This can be caused by either overwatering or underwatering. Always check the soil to determine the cause before you act.
- Needle Drop: It's normal for the plant to shed some of its lower needles as it gets older. However, if your plant is dropping a lot of needles, it could be due to stress from a sudden change in temperature, light, or watering.
- Root Rot: This is a serious problem caused by overwatering and poor drainage. If you suspect root rot, you'll need to repot your plant into fresh, dry soil and trim away any affected roots.
🖼️ Norfolk Island Pine Display Ideas (Styling & Decor)

The beautiful, symmetrical shape of the Norfolk Island Pine makes it a wonderful addition to any home's decor. Here are a few ideas for how to display it:
- Floor Plant: A larger Norfolk Island Pine makes a stunning floor plant. Place it in a bright corner of your living room or bedroom to add a touch of nature.
- Living Christmas Tree: This is a popular use for the Norfolk Island Pine. Decorate it with lightweight ornaments and LED lights for a festive, eco-friendly Christmas tree that you can enjoy all year long.
- Tabletop Tree: Smaller Norfolk Island Pines are perfect for tabletops, desks, or shelves. They can bring a bit of green to any space.
- Grouped with Other Plants: Create a lush, green corner by grouping your Norfolk Island Pine with other plants. Its fine, feathery texture contrasts nicely with plants that have large, broad leaves.
🌟 Norfolk Island Pine Care Tips (Pro Advice)

💧 Stay Moist: Don't let the soil dry out completely. These plants prefer to be kept consistently moist.
💦 Humidity is a Must: Keep the humidity high by misting, using a pebble tray, or placing a humidifier nearby. This is the secret to preventing brown, crispy needles.
🔄 Rotate Regularly: Give your plant a quarter turn every week or two to ensure it grows evenly and doesn't start to lean.
🧼 Keep it Clean: Give your tree a gentle shower with lukewarm water every now and then. This will clean the needles and help to prevent pests.
🥶 No Cold Drafts: Keep your Norfolk Island Pine away from drafty windows and doors, and avoid sudden temperature changes.
❓ Frequently Asked Questions
Why are the needles on my Norfolk Island Pine turning brown and crispy?
Brown, crispy needles are usually a sign of low humidity or underwatering. These are tropical plants that love moist air. Try misting your plant regularly, using a humidifier, or placing it on a pebble tray. Also, make sure you're watering it as soon as the top inch of soil feels dry.
Why are the lower branches of my Norfolk Island Pine dying?
It's natural for a Norfolk Island Pine to shed its lower branches as it ages. However, if it's happening rapidly, it could be a sign of dehydration. Ensure you're watering it thoroughly and consistently.
Is the Norfolk Island Pine toxic to cats and dogs?
Yes, the Norfolk Island Pine is considered mildly toxic to pets if ingested. It can cause gastrointestinal upset and skin irritation. It's best to keep this plant out of reach of curious pets.
Can I prune my Norfolk Island Pine to keep it small?
It's generally not recommended to prune the top of a Norfolk Island Pine, as this will ruin its natural symmetrical shape. You can, however, trim off any dead or brown lower branches. To keep it smaller, you can limit fertilizing.
Why are the branches of my Norfolk Island Pine drooping?
Drooping branches can be a sign of both overwatering and underwatering. Always check the soil. If it's soggy, you're likely overwatering, which can lead to root rot. If the soil is bone dry, the plant is thirsty. These plants prefer consistently moist soil.
Can I keep my Norfolk Island Pine outside in the summer?
Yes, your Norfolk Island Pine will likely enjoy a summer vacation outdoors. Just make sure to place it in a spot with protection from strong winds and harsh, direct sun. Bring it back inside before temperatures drop below 50°F (10°C).
My Norfolk Island Pine is losing its symmetrical shape. What can I do?
If your plant is starting to lean or grow unevenly, it's probably reaching for a light source. To promote even growth, it's a good idea to rotate your plant every few weeks.
ℹ️ Norfolk Island Pine Info
Care and Maintenance
🪴 Soil Type and pH: Well-draining, acidic, peat-based mix.
💧 Humidity and Misting: Moderate to high, 50% or more.
✂️ Pruning: Minimal pruning needed; remove dead lower branches.
🧼 Cleaning: Gently shower with lukewarm water to clean needles and boost humidity.
🌱 Repotting: Every 2-3 years or when root-bound.
🔄 Repotting Frequency: Every 2-3 years.
❄️ Seasonal Changes in Care: Reduce watering and stop fertilizing in fall and winter.
Growing Characteristics
💥 Growth Speed: Slow.
🔄 Life Cycle: Perennial.
💥 Bloom Time: Rarely flowers indoors.
🌡️ Hardiness Zones: 10-11 (outdoors).
🗺️ Native Area: Norfolk Island (South Pacific).
🚘 Hibernation: No (growth slows in winter).
Propagation and Health
📍 Suitable Locations: Living rooms, bright corners, sunrooms.
🪴 Propagation Methods: Challenging; best by seeds.
🐛 Common Pests: Spider Mites, Mealybugs, Scale Insects, Aphids
🦠 Possible Diseases: Root rot, needle necrosis, anthracnose.
Plant Details
🌿 Plant Type: Conifer.
🍃 Foliage Type: Evergreen.
🎨 Color of Leaves: Green.
🌸 Flower Color: N/A (rarely flowers indoors).
🌼 Blooming: Rarely blooms indoors.
🍽️ Edibility: Not edible; toxic if ingested.
📏 Mature Size: Can reach 3-8 feet indoors.
Additional Info
🌻 General Benefits: Air purification, aesthetic appeal, festive decoration.
💊 Medical Properties: None.
🧿 Feng Shui: Brings balance and positive energy; symbolizes growth and harmony when placed in the Southeast direction.
⭐ Zodiac Sign Compatibility: Capricorn.
🌈 Symbolism or Folklore: Wisdom, life, and harmony.
📝 Interesting Facts: Despite its name, the Norfolk Island Pine is not a true pine. It's a tropical plant from a prehistoric family of conifers that existed during the time of the dinosaurs. The tree is a symbol of its native Norfolk Island and is even featured on its flag.
Buying and Usage
🛒 What to Look for When Buying: Look for a plant with vibrant green, soft needles. Avoid any with browning or crispy branches. Often, multiple trees are planted in one pot to create a fuller look; you may want to separate them for long-term health.
🪴 Other Uses: A popular, eco-friendly alternative to a cut Christmas tree.
Decoration and Styling
🖼️ Display Ideas: As a floor plant in a bright corner, a centerpiece on a large table, or decorated as a living Christmas tree. Its symmetrical shape makes it a great focal point.
🧵 Styling Tips: Pairs well with other tropical plants to create a lush, green corner. Decorate with lightweight ornaments and LED lights for the holidays to avoid damaging the delicate branches.
Houseplant101 Forum
Questions & Comments
Ask a question, share your plant experience, or help other plant owners.
Comments are temporarily unavailable.
Open the Houseplant101 ForumNo comments yet
Be the first to ask a question or share your experience about this page.
Log in or create an account
Comments use your Houseplant101 Forum account, but you can stay on this page.
Create a new account